Structuring and composition
JacpFX can help you to define your application UI in various ways. It allows you to mix FXML and JavaFX easily.
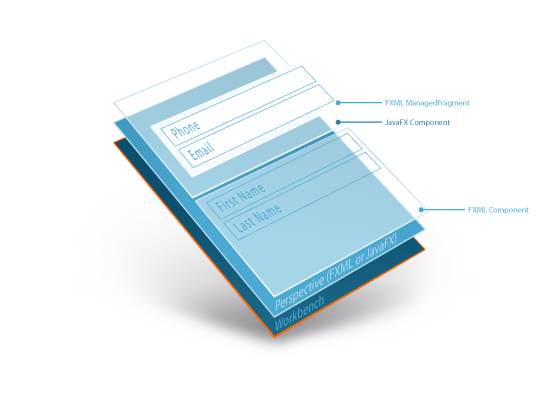
The root of a JacpFX application is always the FXWorkbench which defines an application window.
A workbench contains 1-n FXPerspective(s), each defining the layout of their view. A perspective defines his view either programmatically with JavaFX or by using a FXML file. In each perspective view you can register several UI nodes as a target (placeholder) for a FXComponent view.
A perspective contains 0-n UI FXComponent(s). Each FXComponent registers for a specific target (defined in the parent perspective) where it's view will be rendered. A FXComponent can represent e.g. a complex form or any other complex UI part. Like any perspective you can define the view either in FXML or JavaFX.
A FXComponent can contain 0-n ManagedFragments. A ManagedFragment is a reusable custom control which can be e.g a part of a complex form (the address part) and can also be reused in other FXComponents. Like all FXPerspectives and FXComponents, a ManagedFragment can have a FXML or JavaFX view.
The following example demonstrates how to define a FXML and a JavaFX perspective, how to declare the target areas for Component views and how to implement FXML- and JavaFX-Components.
Define the perspective view
The first step is to create two FXPerspective(s) having the same UI, one implemented with a FXML view and the other with a JavaFX view.
FXML-FXPerspective example
@Perspective(id = BaseConfig.ID, name = "p1",components = {…},
        viewLocation = "/fxml/ExamplePerspective.fxml")
public class ExampleFXMLPerspective implements FXPerspective {
   …
}
The ExamplePerspective.fxml file:
<BorderPane id="mainPane"
            xmlns="http://javafx.com/javafx/8" xmlns:fx="http://javafx.com/fxml/1">
    <center>
        <SplitPane fx:id="mainLayout" dividerPositions="0.55" focusTraversable="true"
                   orientation="VERTICAL"  HBox.hgrow="ALWAYS">
            <items>
                <HBox fx:id="contentTop" />
                <HBox fx:id="contentBottom">
                    <children>
                        <Button fx:id="myButton" mnemonicParsing="false" text="my button"/>
                    </children>
                </HBox>
            </items>
        </SplitPane>
    </center>
</BorderPane>
JavaFX-FXPerspective example
The code example below will produce exactly the same UI output like the FXML-FXPerspective. You are free to mix FXML- and JavaFX-FXPerspective(s) in one workbench.
@Perspective(id = BaseConfig.ID, name = "p1",components = {…})
public class ExampleJavaFXPerspective implements FXPerspective {

    @PostConstruct
    public void onStartPerspective(final PerspectiveLayout perspectiveLayout,final FXComponentLayout layout,
                                   final ResourceBundle resourceBundle) {
        BorderPane mainPane = new BorderPane();

        SplitPane mainLayout = new SplitPane();
        mainLayout.setOrientation(Orientation.VERTICAL);
        mainLayout.setDividerPosition(0, 0.55f);
        mainPane.setCenter(mainLayout);

        HBox contentTop = new HBox();
        HBox contentBottom = new HBox();

        contentBottom.getChildren().add(new Button("my button"));
        mainLayout.getItems().addAll(contentTop,contentBottom);

        // Register root component
        perspectiveLayout.registerRootComponent(mainPane);
        ...
    }
}
Note: In case of JavaFX views you must register the root Component of your view:
// Register root component
perspectiveLayout.registerRootComponent(mainPane);
The resulting UI will look in both cases (FXML and JavaFX) like this:
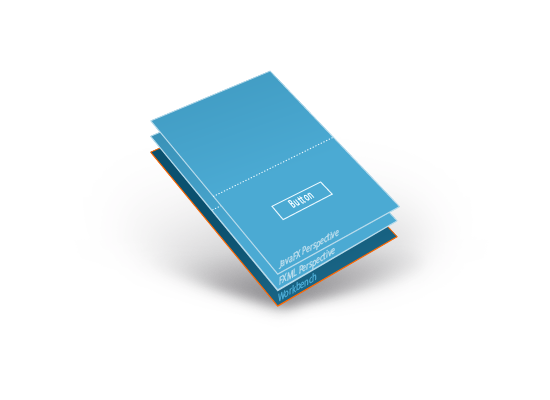
Component rendering
Both FXPerspective(s) define a very basic SplitPane layout with a top- and a bottom-content area. The examples above define a HBox for the top- and the bottom-area. Both Nodes can be registered to be a target for Components.
Register targets in the FXML perspective
@Perspective(id = BaseConfig.ID, name = "p1",components = {…},
        viewLocation = "/fxml/ExamplePerspective.fxml")
public class ExampleFXMLPerspective implements FXPerspective {
    @FXML
    private HBox contentTop;
    @FXML
    private HBox contentBottom;

    @PostConstruct
    public void onStartPerspective(final PerspectiveLayout perspectiveLayout, final FXComponentLayout layout,
                                   final ResourceBundle resourceBundle) {
        // register left menu
     perspectiveLayout.registerTargetLayoutComponent(PerspectiveIds.TARGET_CONTAINER_TOP, contentTop);
        // register main content
     perspectiveLayout.registerTargetLayoutComponent(PerspectiveIds.TARGET_CONTAINER_BOTTOM, contentBottom);

    }
}
Register targets in the JacpFX-FXPerspective(s)
@Perspective(id = BaseConfig.ID, name = "p1",components = {…})
public class ExampleJavaFXPerspective implements FXPerspective {

    @PostConstruct
    public void onStartPerspective(final PerspectiveLayout perspectiveLayout,final FXComponentLayout layout,
                                   final ResourceBundle resourceBundle) {
        BorderPane mainPane = new BorderPane();
        SplitPane mainLayout = new SplitPane();
        ...
        HBox contentTop = new HBox();
        HBox contentBottom = new HBox();
        ...
        // Register root component
        perspectiveLayout.registerRootComponent(mainPane);
        ...
        // register left menu
     perspectiveLayout.registerTargetLayoutComponent(PerspectiveIds.TARGET_CONTAINER_TOP, contentTop);
        // register main content
     perspectiveLayout.registerTargetLayoutComponent(PerspectiveIds.TARGET_CONTAINER_BOTTOM, contentBottom);
    }
}
FXComponent-views
Component views are the detailed parts of your perspective view. Each FXPerspective-view can have many FXComponent-views defined in FXML or programmatically.
FXML-FXComponent example:
@DeclarativeView(id = ComponentIds.COMPONENT_ONE,
        name = "SimpleView",
        active = true,
        resourceBundleLocation = "bundles.languageBundle",
        initialTargetLayoutId = PerspectiveIds.TARGET_CONTAINER_TOP,
        viewLocation = "/fxml/ComponentOne.fxml")
public class ComponentOne implements FXComponent {

    @FXML
    private VBox mainPane;

    @Override
    public Node handle(final Message message) {
        // runs in worker thread
        return null;
    }

    @Override
    public Node postHandle(final Node arg0,
                           final Message message) {
        // runs in FX application thread
        return null;
    }

    @PostConstruct
    public void onStartComponent(final FXComponentLayout arg0,
                                 final ResourceBundle resourceBundle) {
    }
}
Note: the "initialTargetLayoutId" attribute registers the FXComponent-view for a specific targetLayout defined in the parent perspective. The current FXML-FXComponent will be registered for "TARGETCONTAINERTOP" in the parent FXPerspective.
The ComponentOne.fxml file:
<VBox fx:id="mainPane" xmlns="http://javafx.com/javafx/8"
      xmlns:fx="http://javafx.com/fxml/1" HBox.hgrow="ALWAYS">
    <children>
        <HBox prefHeight="100.0" prefWidth="200.0" fx:id="top">
            <children>
                <Label text="First name:">
                   ...
                </Label>
                <TextField prefHeight="50.0" HBox.hgrow="ALWAYS">
                    ...
                </TextField>
            </children>
        </HBox>
        <HBox prefHeight="100.0" prefWidth="200.0" fx:id="bottom">
            ...
        </HBox>
    </children>
</VBox>
JavaFX-FXComponent example
The following FXComponent example will produce the same UI output as the FXML example above.
@View(id = ComponentIds.COMPONENTTWO,
        name = "SimpleView",
        active = true,
        resourceBundleLocation = "bundles.languageBundle",
        initialTargetLayoutId = PerspectiveIds.TARGETCONTAINER_MAIN)
public class ComponentTwo implements FXComponent {
    private VBox pane;
    @Override
    public Node handle(final Message message) {
        // runs in worker thread
        return null;
    }
    @Override
    public Node postHandle(final Node arg0,
                           final Message message) {
        // runs in FX application thread
        return this.pane;
    }
    @PostConstruct
    public void onStartComponent(final FXComponentLayout arg0,
                                 final ResourceBundle resourceBundle) {
       pane = (VBox) createUI();
    }
    private Node createUI() {
        final VBox pane = new VBox();
        HBox.setHgrow(pane, Priority.ALWAYS);
        final HBox top = new HBox();
        top.setPrefHeight(100);
        top.setPrefWidth(200);
        Label firstName = new Label("First name:");
        firstName.setFont(new Font(29.0));
        HBox.setMargin(firstName, new Insets(15,5,0,5));
        TextField firstNameText = new TextField();
        firstNameText.setPrefHeight(50);
        firstNameText.setPadding(new Insets(10, 0, 0, 0));
        HBox.setHgrow(firstNameText,Priority.ALWAYS);
        HBox.setMargin(firstNameText, new Insets(10,5,0,0));
        top.getChildren().addAll(firstName,firstNameText);
        final HBox bottom = new HBox();
        ...
        pane.getChildren().addAll(top,bottom);
        return pane;
    }
}
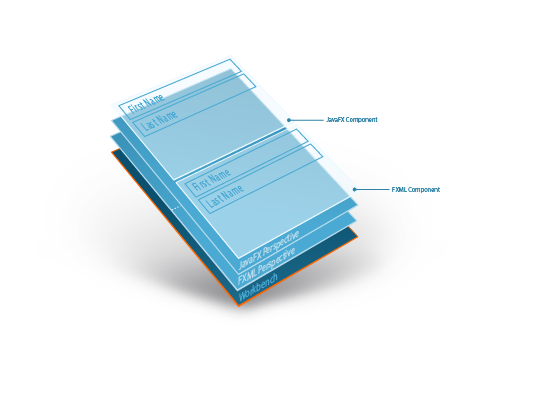
The JavaFX FXComponent will be registered for "TARGETCONTAINERMAIN" in the parent perspective. The resulting application will show both (the FXML and the JavaFX-FXComponent) in one FXPerspective.
The resulting application
Managed fragments
The next (optional) step is to create reusable controls, the so called "ManagedFragments". A ManagedFragment has access to the parent context (of the FXComponent or FXPerspective), can use dependency injection like any other FXComponent and can be used to create parts of your view. Like any other FXComponent or perspective a ManagedFragment can define it's view either in JavaFX or FXML.
The FXML ManagedFragment example
@Fragment(id = ComponentIds.FRAGMENT_ONE,
        viewLocation = "/fxml/FragmentOne.fxml",
        resourceBundleLocation = "bundles.languageBundle",
        localeID = "en_US",
        scope = Scope.PROTOTYPE)
public class FragmentOne {
}
The FragmentOne.fxml file
<VBox fx:id="mainPane" xmlns="http://javafx.com/javafx/8"
      xmlns:fx="http://javafx.com/fxml/1" HBox.hgrow="ALWAYS" style="-fx-background-color:#f5f5f5">
    <children>
        <HBox prefHeight="100.0" prefWidth="200.0" fx:id="top">
            <children>
                <Label text="Phone:">
                    <font>
                        <Font size="29.0"/>
                    </font>
                    <HBox.margin>
                        <Insets left="5.0" right="5.0" top="15.0"/>
                    </HBox.margin>
                </Label>
                <TextField prefHeight="50.0" HBox.hgrow="ALWAYS">
                    <padding>
                        <Insets top="10.0"/>
                    </padding>
                    <HBox.margin>
                        <Insets right="5.0" top="10.0"/>
                    </HBox.margin>
                </TextField>
            </children>
        </HBox>
        <HBox prefHeight="100.0" prefWidth="200.0" fx:id="bottom">
           ...
        </HBox>
    </children>
</VBox>
The JavaFX ManagedFragment example
The same UI can be also achieved using plain JavaFX. In this case a ManagedFragment extends a Node / Control.
@Fragment(id = ComponentIds.FRAGMENTTWO,
        resourceBundleLocation = "bundles.languageBundle",
        localeID = "enUS",
        scope = Scope.PROTOTYPE)
public class FragmentTwo extends VBox{
    public FragmentTwo() {
          setStyle("-fx-background-color:#f5f5f5");
          HBox.setHgrow(this, Priority.ALWAYS);
          final HBox top = new HBox();
          top.setPrefHeight(100);
          top.setPrefWidth(200);
          Label firstName = new Label("Phone:");
          firstName.setFont(new Font(29.0));
          HBox.setMargin(firstName, new Insets(15,5,0,5));
          TextField firstNameText = new TextField();
          firstNameText.setPrefHeight(50);
          firstNameText.setPadding(new Insets(10, 0, 0, 0));
          HBox.setHgrow(firstNameText,Priority.ALWAYS);
          HBox.setMargin(firstNameText, new Insets(10,5,0,0));
          top.getChildren().addAll(firstName,firstNameText);
          final HBox bottom = new HBox();
          ...
          this.getChildren().addAll(top,bottom);
          }
}
Creating a ManagedFragment instance
ManagedFragments can be used in FXPerspectives or FXComponent. To create a new fragment instance, the JacpFX-Context provides a method to create a typed fragment-handler. The following example will create a ManagedFragment in ComponentOne and include the fragment view to his FXComponent-view.
@View(id = ComponentIds.COMPONENTTWO,
        name = "SimpleView",
        active = true,
        resourceBundleLocation = "bundles.languageBundle",
        initialTargetLayoutId = PerspectiveIds.TARGETCONTAINER_MAIN)
public class ComponentTwo implements FXComponent {
...
    @PostConstruct
    public void onStartComponent(final FXComponentLayout arg0,
                                 final ResourceBundle resourceBundle) {
        pane = (VBox) createUI();
        HBox lastRow = new HBox();
        ManagedFragmentHandler fragment = context.getManagedFragmentHandler(FragmentOne.class);
        lastRow.getChildren().addAll(fragment.getFragmentNode());
        pane.getChildren().add(lastRow);
    }
}
Note: The same ManagedFragment class can be reused in any other FXComponent or FXPerspectives. Detailed documentation about context access and the scope of ManagedFragments can be found in the documentation section.
The final UI

The example code you can download here : ui composition project
